Basement Permit Inspection Requirements: What Inspectors Check at Each Stage
If you just found out your basement bedroom is not legal, or your realtor flagged a missing egress window before listing, the fear usually comes down to one thing: inspections. Understanding basement permit inspection stages and requirements before any drywall goes up is the single best way to pass the first time. This guide walks through the inspection process step by step, the way it typically runs in Minneapolis and the surrounding area, so you know what the inspector looks at, when, and why.
One note up front. Every city handles details a little differently, and codes get updated. Treat this as a map of the process, then confirm specifics with your local building department or a contractor who pulls basement permits regularly. As of 2026, the general sequence below holds across most Minnesota cities.
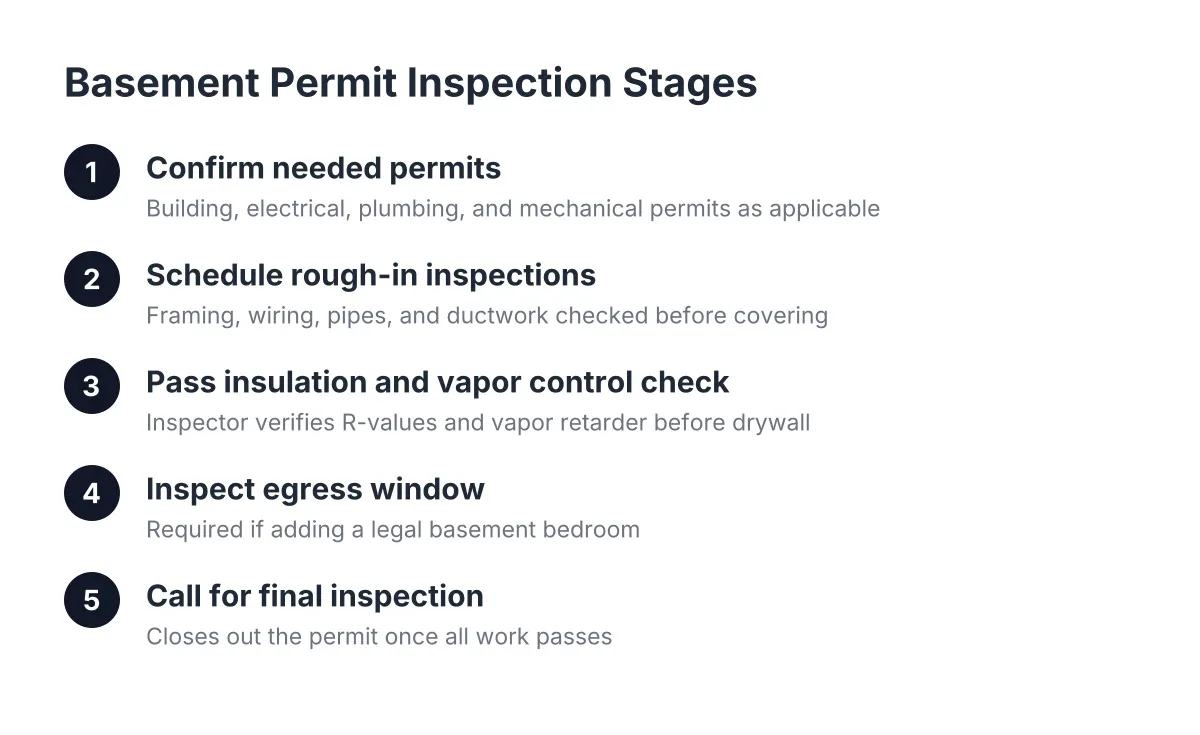
Step 1: Confirm Which Permits Your Basement Project Needs
Before anyone swings a hammer, sort out the paperwork. A basement finishing project in Minneapolis usually needs a building permit, plus separate permits for electrical, plumbing, and mechanical (heating and ventilation) work. If you are adding a basement bathroom, the plumbing permit is not optional. If you are adding an egress window for a legal bedroom, that work needs a permit too, because you are cutting into the structure of the house.
This matters for landlords as much as homeowners. Say you own a duplex and want to add a legal basement bedroom to raise the rent. Without basement finishing permits on file, that bedroom does not count at appraisal, can get flagged at a rental license inspection, and becomes a disclosure problem when you sell. The permit record is what makes the room legal, not the quality of the drywall.
A quick checklist of permits a typical finished basement project touches:
- Building permit for framing, insulation, egress windows, and general construction
- Electrical permit for new circuits, outlets, and lighting
- Plumbing permit for a basement bathroom, wet bar, or laundry hookup
- Mechanical permit for ductwork, bath fans, or a new heat source
Each permit comes with its own inspections. That is the part that worries people, so the rest of this guide breaks down what happens at each one.
Step 2: Schedule the Rough-In Inspections Before Covering Anything
Here is the rule that drives the whole sequence: inspectors must see the work before it gets covered. Framing, wiring, pipes, and ductwork all get inspected while they are still exposed. Close up a wall before the inspector signs off, and you may be opening it back up at your own expense.
Basement projects typically involve two or more rough-in inspections early in the process. The electrical rough-in usually comes first, once wiring is run but before insulation goes in. Plumbing and mechanical rough-ins happen in the same window if your project includes a bathroom or new ductwork. The framing inspection often happens alongside these, since the inspector can see the whole skeleton at once.
Therefore, build your schedule around these checkpoints. Do not book the insulation crew until the rough-in inspections pass. A failed rough-in is not a disaster; the inspector tells you what to fix, you fix it, and they come back. However, a covered-up failure is expensive.
Basement Permit Inspection Stages and Requirements at Rough-In
At the rough-in stage, basement permit inspection stages focus on structure, safety, and spacing. The inspector checks framing sizes, fastening, fire blocking, wiring methods, box fill, circuit protection, pipe slope, and venting. Everything must match the approved plans, and everything must still be visible. This is the inspection most projects fail on the first visit, usually over small, fixable items.
Common things inspectors look for at rough-in:
- Framing that matches the approved plan, with proper headers over door openings and bottom plates cut out where doors go
- Fire blocking at the top of walls and around soffits, so fire cannot travel inside wall cavities
- Correct wiring methods for a basement, since exposed non-metallic cable has limits; according to the National Electrical Code (NFPA 70), running Romex inside EMT conduit is against code in damp or wet locations
- Grounding done right; according to NEMA, continuously connected metal EMT conduit can itself serve as the grounding path back to the panel
- Plumbing drains with proper slope and venting, pressure-tested where required
- Egress window rough openings framed to the size shown on the approved plans
If a licensed electrician and plumber pulled their own permits, they usually handle their own inspections. For a landlord juggling tenant turnover deadlines, that division of labor is worth the cost; licensed trades know what their inspector wants and rarely fail twice.
Step 3: Pass the Insulation and Vapor Control Inspection
After rough-ins pass, insulation goes in, and in most Minnesota cities the inspector comes back to look at it before drywall. This inspection exists because Minneapolis basements fight moisture year-round, and the wrong insulation approach traps condensation inside walls where it grows mold you will not see for years.
The inspector checks insulation R-values against Minnesota energy code, looks at how foundation walls are insulated, and verifies vapor control is handled correctly. Effective basement wall insulation needs to resist air movement and act as a vapor retarder, which is why rigid foam against foundation walls is the common approach here rather than fiberglass alone.
Floors deserve attention too, even though they are not always part of the formal inspection. A vapor barrier under a concrete slab blocks ground moisture from wicking up into the concrete, according to W. R. Meadows. Older Minneapolis homes often lack one. A simple test before choosing basement flooring: tape a garbage bag to the slab overnight. Condensation underneath in the morning means moisture is coming through, and a subfloor system is the safer call under your finished flooring.
Step 4: Get the Egress Window Inspected if You Are Adding a Bedroom
If the whole reason you started this project is a bedroom, the egress window is the inspection that matters most to you. A basement sleeping room must have a code-compliant emergency escape opening, and the inspector verifies the installed window against the approved plans. Cutting the foundation for a new window is permitted work in its own right, and the inspection confirms the opening is structurally supported and properly flashed against water.
Many homeowners worry that cutting into the foundation invites water problems. That concern is fair, and it is why this work gets inspected rather than left to judgment. Proper drainage at the window well, correct flashing, and a sound lintel over the opening are exactly what the inspector is there to confirm. Done right, a new egress window should not create moisture issues; done without a permit, nobody ever checks.
For a landlord, this step often decides whether a basement room can legally be rented as a bedroom at all. The inspection record is your proof if a city rental inspector or an appraiser asks later.
Step 5: Call for the Final Inspection and Close the Permit
The final inspection happens when the basement is done: drywall finished, flooring in, outlets covered, fixtures installed, and the bathroom working if you added one. The inspector walks the space and checks life-safety items rather than cosmetics. Expect them to test GFCI outlets, check smoke and carbon monoxide detectors, confirm stair handrails and headroom, verify the bath fan vents outside, and open and close the egress window.
Closing the permit is the step people skip, and it causes the most trouble later. An open permit sits in city records. In addition, a title search before a sale will surface it, and suppose a homeowner finished their basement in 2021 but never called for the final; in that scenario they are now chasing a final inspection on covered work while a buyer waits, which can mean cutting open drywall to show what is behind it. Call for the final, get the sign-off, and keep the paperwork with your house records.
Meeting Basement Permit Inspection Stages Requirements the First Time
Passing inspections on the first visit comes down to three habits: build exactly to the approved plans, never cover work before its inspection, and use licensed trades for electrical, plumbing, and mechanical work. Inspectors fail hidden work and improvised changes, not honest projects that follow the plan. Most first-time failures are small corrections, fixed in a day.
A few habits that keep the sequence smooth:
- Keep the approved plans and permit card on site for every inspection.
- Photograph everything before it gets covered, even after the inspection passes.
- Fix flagged items quickly and schedule the re-inspection right away, since open corrections stall the whole project.
- If the inspector flags something you do not understand, ask. Inspectors explain; they are not trying to trap you.
Why the Inspection Process Is Worth the Hassle
It is tempting to see inspections as red tape, especially when a rough-in failure costs you a week. However, the process protects the money you are putting into the project. An average basement remodel runs $30 to $75 per square foot according to Angi, and the National Association of Realtors Remodeling Impact Report found homeowners recover 64% of basement finishing costs at sale, one of the highest returns among the 20 projects studied. That resale value depends on the basement being legal, documented, and permitted.
An unpermitted finished basement, by contrast, can subtract value. Appraisers may refuse to count the square footage, buyers' inspectors flag it, and cities can require you to open walls or pull retroactive permits before closing. For a landlord with multiple properties, one unpermitted bedroom can hold up a rental license across an entire building.
The inspection sequence is predictable once you know it: rough-in, insulation, egress, final. Plan your project around those four checkpoints, keep the work visible until each one passes, and the inspector becomes a second set of eyes on your investment rather than something to fear.
If you need basement finishing, Minneapolis Basement Finishing Pros can help.
Prefer to talk it through? Call (651) 758-8806 — a quick call is usually the fastest way to get a straight answer for your situation.