Basement Waterproofing Sealer Guide: 8 Options Compared for Minneapolis Homes
If you have a half-finished basement in Minneapolis and you are trying to figure out what to do about damp walls before anyone hangs drywall, you have probably searched for a basement waterproofing sealer. The market is crowded: waterproof paint, cement coatings, penetrating sealers, membranes, and caulks all claim to keep water out. Most guides you will find were written for national audiences and ignore what actually pushes moisture through a Minneapolis foundation, which is clay soil that holds water against the wall and vapor pressure that drives that moisture through porous concrete.
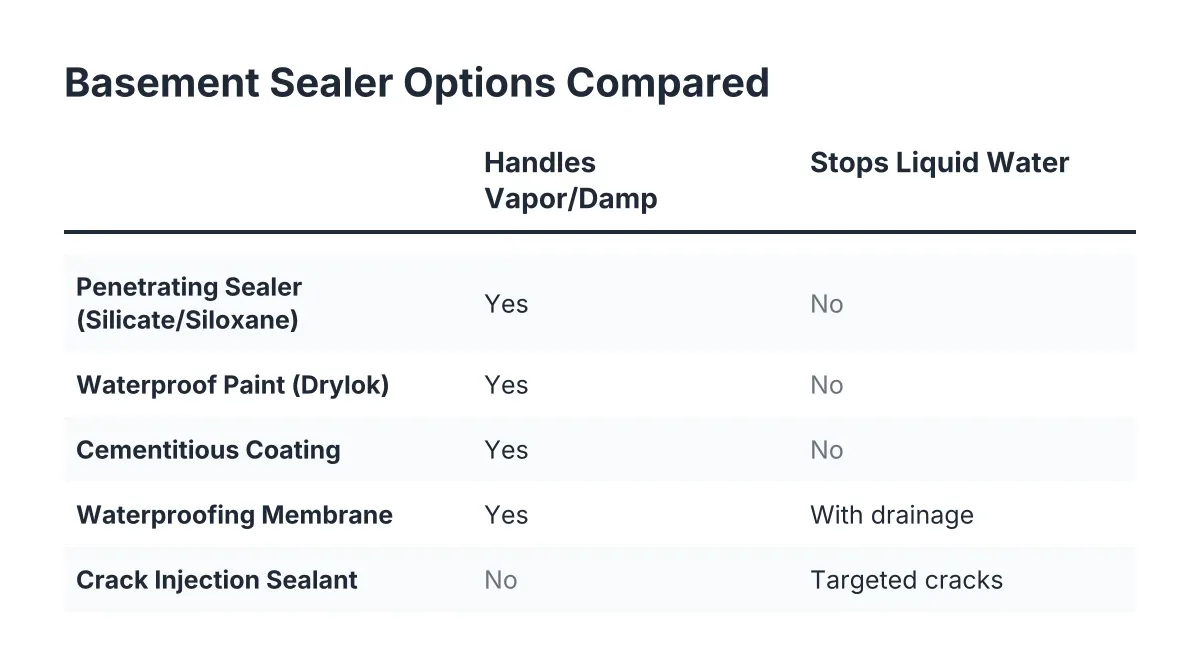
This guide compares eight sealer and sealing options, what each one actually does, and where each one fails. The short version up front: a sealer can control dampness and vapor, but no coating applied from the inside will stop liquid water under pressure. Knowing which problem you have decides which product makes sense.
First, Know What Problem You Are Sealing Against
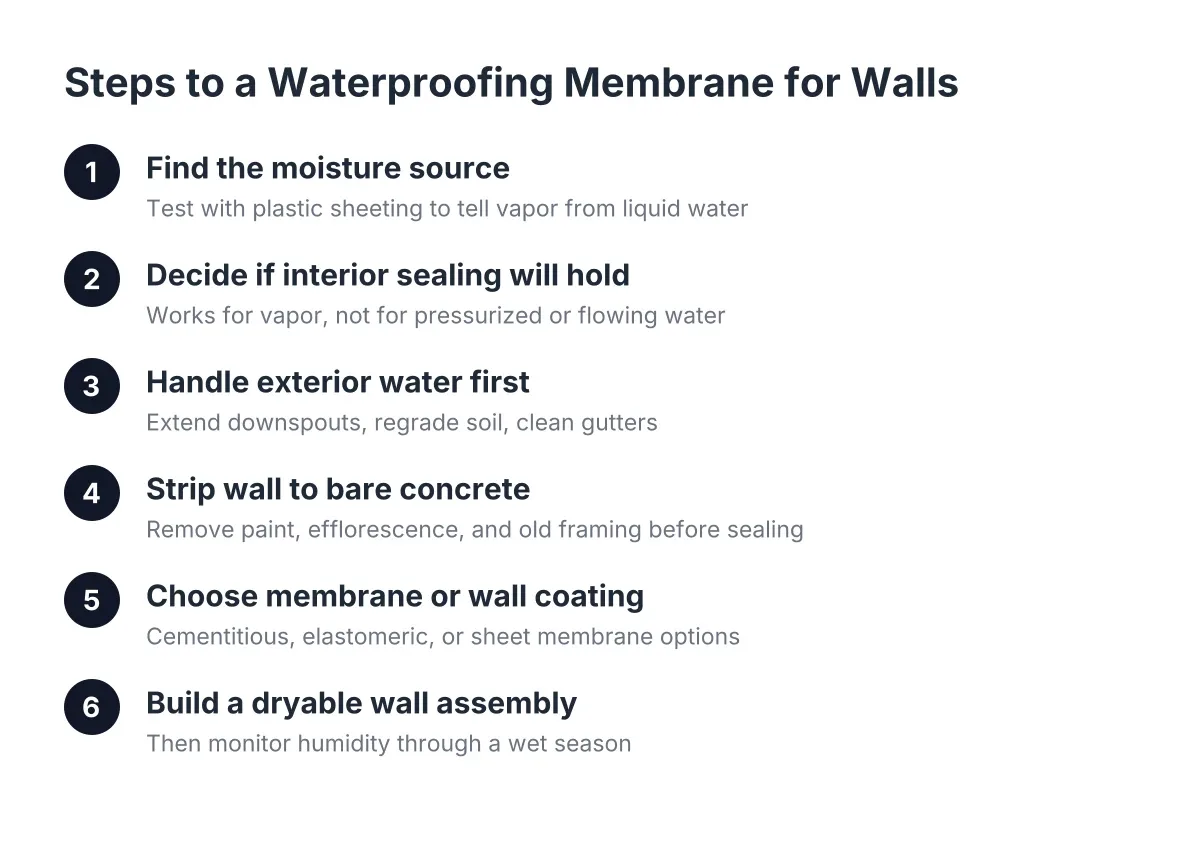
Before comparing products, sort your moisture problem into one of two buckets. Bucket one is vapor and dampness: musty smell, white chalky residue on the concrete, condensation, or a floor that darkens after rain but never puddles. Bucket two is liquid water: seepage at the wall-floor joint, water through cracks, or a wet floor after a storm.
Sealers handle bucket one. Bucket two needs drainage, grading, gutter work, or an interior drain and sump pump, not a coating. Minneapolis sits on heavy clay soil that drains slowly, so hydrostatic pressure against foundation walls is common here after spring thaw and summer downpours. Any basement waterproofing sealer applied against that kind of pressure will eventually blister, peel, or push off the wall.
A quick tape test helps you sort it. Tape a square of plastic sheeting to the bare concrete wall and check it after 48 hours. Moisture on the wall side of the plastic means vapor coming through the concrete. Moisture on the room side means condensation from humid interior air, which is a basement humidity control problem, not a wall problem.
Penetrating Concrete Sealers: Silicates and Siloxanes for Basement Waterproofing
Penetrating sealers soak into the pores of the concrete and react chemically to block moisture paths, rather than forming a film on the surface. Because there is no coating to peel, they hold up better against vapor pressure than paint-style products. They also leave the wall looking like bare concrete, which does not matter once framing and drywall go up.
The trade-off is that they reduce vapor transmission; they do not stop liquid water through cracks or joints. They also need clean, bare, unpainted concrete to work. If a previous owner already rolled paint on your walls, a penetrating sealer cannot soak in until that paint comes off.
For a stalled project where the walls are still bare, this is often the most durable first layer. It pairs well with the wall assembly choices covered later in this list.
2. Waterproof Paint for Concrete (Drylok and Similar Coatings)
Drylok waterproofing and similar products are thick, cementitious paints that fill surface pores and resist modest water pressure. They are cheap, available at any home center, and easy to roll on yourself. As a basement water sealer paint for damp but not leaking walls, they do a reasonable job of cutting vapor and dampness.
However, waterproof paint for concrete is a film, and films fail where pressure is constant. On a Minneapolis wall with wet clay on the other side, expect bubbling and peeling in the wettest spots within a few seasons. Paint also hides problems; a coated wall makes it harder for the next contractor to read where water is actually entering.
Use it as a dampness reducer on walls that pass the tape test with only light vapor. Skip it as a fix for active seepage.
3. Cementitious Coatings and Parge-Style Sealers
Cement-based coatings are troweled or brushed on and cure into a hard, bonded layer, thicker and tougher than paint. On older Minneapolis foundations, including block walls, they can bridge minor surface roughness and slow vapor movement well. They resist abrasion, so they survive the construction work that follows better than a painted film.
Still, they are rigid. Foundation walls move a little with freeze-thaw cycles, and rigid coatings crack where the wall cracks. Hairline cracks in the coating reopen the same moisture path you paid to close.
These make sense on rough or previously patched walls where paint would not bond evenly. Plan on inspecting and spot-repairing before you insulate over them.
4. Waterproofing Membrane for Concrete Walls
A waterproofing membrane for concrete is a sheet or thick liquid-applied layer that forms a continuous barrier. Interior dimpled membranes do something different from sealers: instead of blocking water, they create an air gap that directs any moisture down to a drain system. That approach accepts that some water gets through and manages it, which is more honest about how Minneapolis clay behaves.
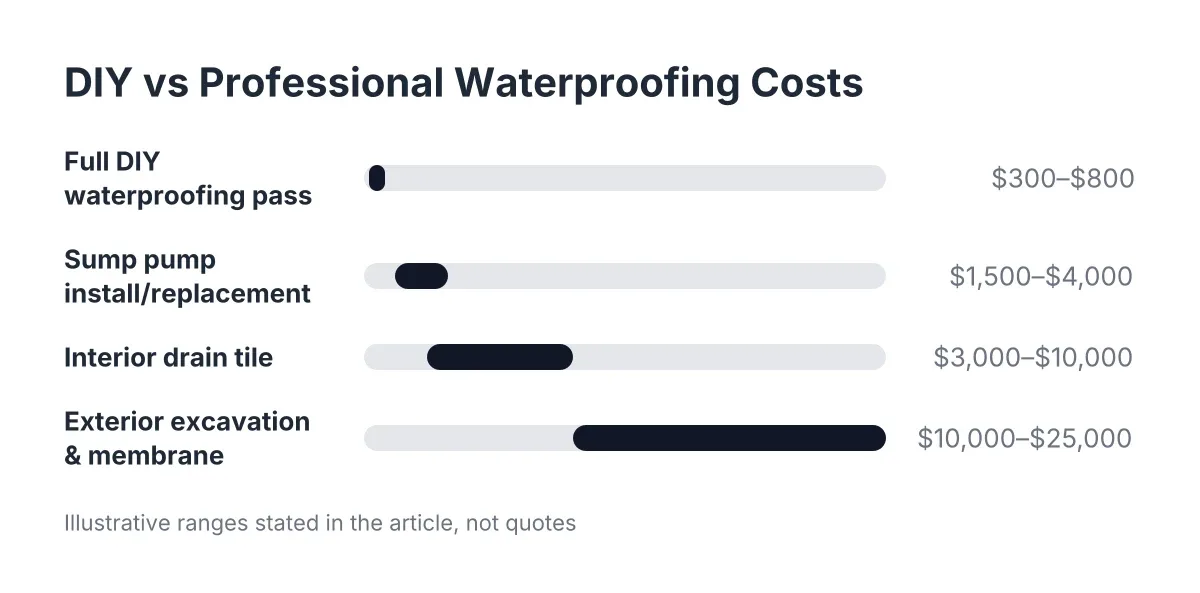
The catch is that an interior membrane only makes sense with somewhere for water to go, usually an interior drain tile tied to a sump pump. Installed alone, it just hides water against the foundation. Exterior membranes are the gold standard but require excavation, which is a different budget conversation entirely.
If your basement has ever had standing water, a membrane plus drainage beats any sealer in a can. This is the point where sump pump planning and basement finishing decisions need to happen together, before framing.
5. Crack Injection Sealants (Epoxy and Polyurethane)
Crack injection targets the specific place water enters instead of coating the whole wall. Polyurethane injection foam expands and stays flexible, which suits poured walls that move with the seasons. Epoxy injection is rigid and structural, better when a crack also needs strength restored.
For example, suppose a homeowner buys a house where the previous owner framed half the basement, and one framed bay hides a vertical crack that weeps every spring. In that scenario, opening that bay and injecting the crack costs a few hundred dollars as a typical estimate, while painting over it would have failed inside the new wall where nobody could see it.
Injection is usually a job for a crew with the right ports and material, not a caulk-gun fix. Surface caulk over a crack that sees water pressure almost always reopens.
6. Masonry Caulks and Joint Sealants
High-quality exterior sealant has a real place around basement windows, penetrations, and the gaps where pipes and vents pass through the foundation. After concrete repairs around a basement window, sealing the remaining gaps on the sides and top with exterior-grade caulk is the right way to weatherproof the opening. These are small, cheap wins that stop drafts and wind-driven water.
Where caulk goes wrong is the wall-floor joint, called the cove joint. Water at that joint is under hydrostatic pressure from below, and caulk will not hold it back. Sealing the cove joint traps water in the wall and floor, and it often just moves the leak a few feet down the wall.
Treat caulk as detail work, not waterproofing. It finishes a system; it is not the system.
7. Vapor Barriers Under Slabs and Behind Walls
A vapor barrier under a concrete slab blocks moisture transmission from the ground into the concrete above, according to W. R. Meadows. In new work, that sheet of poly under the slab is what keeps a finished basement floor dry from below. In an older Minneapolis home, there may be no barrier under the slab at all, which is why flooring choice matters so much before you finish.
However, vapor barriers in the wrong place cause damage. Poly stapled on the interior side of basement stud walls traps moisture in the cavity, because water that gets in through air leaks or wicking cannot dry back to the room. This is one of the most common tear-out items in half-finished basements: framing set against damp concrete with plastic on the room side, growing mold nobody can see.
If your stalled project already has interior poly on the studs, that is worth a professional look before drywall goes up. What can stay and what must come out depends on how the whole assembly handles moisture in both directions.
8. Rigid Foam and Spray Foam as the Sealing Layer
Taped rigid foam board and closed-cell spray foam do double duty on basement walls: they insulate, and they act as an air-impermeable vapor retarder against the concrete. That stops warm interior air from condensing on the cold wall in a Minneapolis January, which is the moisture source most sealer guides never mention. Foam against the concrete, then framing, then moisture-resistant drywall is the wall assembly that holds up here.
The trade-off is cost and sequencing. Foam is not a repair product; it goes on after leaks, cracks, and drainage are handled. Covering an active leak with spray foam buries the problem and makes the eventual fix more expensive.
For the half-finished basement owner, this is the honest test of existing work. Framing set tight to bare concrete with fiberglass batts and poly is a candidate for tear-out; framing set off the wall with room for foam behind it may be salvageable.
How to Choose a Basement Waterproofing Sealer for Your Situation
Match the product to the moisture source, not to the marketing on the can. As a working shortlist for 2026:
- Vapor and dampness only, bare walls: penetrating sealer first, foam insulation as the wall assembly.
- Light dampness, budget project: waterproof paint or Drylok-style coating, applied knowing it may need recoating.
- Rough or patched block walls: cementitious coating, inspected before insulating.
- Weeping cracks: polyurethane or epoxy injection at the crack itself.
- Any history of standing water: interior drain and sump pump with a dimpled membrane, before any sealer money is spent.
- Gaps at windows and penetrations: exterior-grade sealant as detail work.
One decision rule worth stating plainly: a basement waterproofing sealer is a moisture management layer, not a substitute for drainage. If water shows up as liquid, fix the path of the water first. Also skip the shortcut of pouring new concrete against the old wall to raise the floor or cap a leak; the cold joint between new and old material will not hold back water.
Basement moisture control is the first budget line of any finishing project here, and it is money well spent. According to the National Association of Realtors, homeowners gave basement finishing a joy score of 9.5 out of 10 in the NAR Remodeling Impact Report, and the same report found 64% of basement finishing costs recovered at sale. That return only holds if the space stays dry.
When Sealer Reviews Are Not Enough
Reading basement waterproofing sealer reviews online tells you how a product performed on someone else's wall, in someone else's soil. A review from a sandy-soil market says little about a 1950s Minneapolis foundation sitting in clay. Local conditions decide whether a coating lasts ten years or one spring.
If your basement was framed or drywalled by a previous owner and you cannot see the walls, get eyes on the concrete before choosing any product. A moisture assessment before finishing is cheaper than tearing out moldy drywall after. Some existing work can be saved; some cannot, and an honest look at the foundation is the only way to know which is which.
If you need basement finishing, Minneapolis Basement Finishing Pros can help.
Prefer to talk it through? Call (651) 758-8806 — a quick call is usually the fastest way to get a straight answer for your situation.