Basement Bathroom Ventilation: Preventing Mold and Moisture Step by Step
A basement bathroom sits in the dampest, coolest part of your house. That makes basement bathroom exhaust venting, preventing mold and moisture before they start, the single most important part of the job after the plumbing itself. Miss it, and you can fail a final inspection, grow mold behind brand-new drywall, or end up with that musty smell no amount of cleaning fixes. This guide walks through the ventilation work step by step, in the order a Minneapolis contractor would actually do it, so you know what to require before anyone hangs drywall.
One quick note on why basements are different. A main-floor bathroom dries out fast because the house around it is warm and dry. A basement bathroom is surrounded by cold concrete, and warm shower air condenses on cold surfaces. So the ventilation plan has to move moist air outside quickly and keep it from soaking into walls and floors on the way.
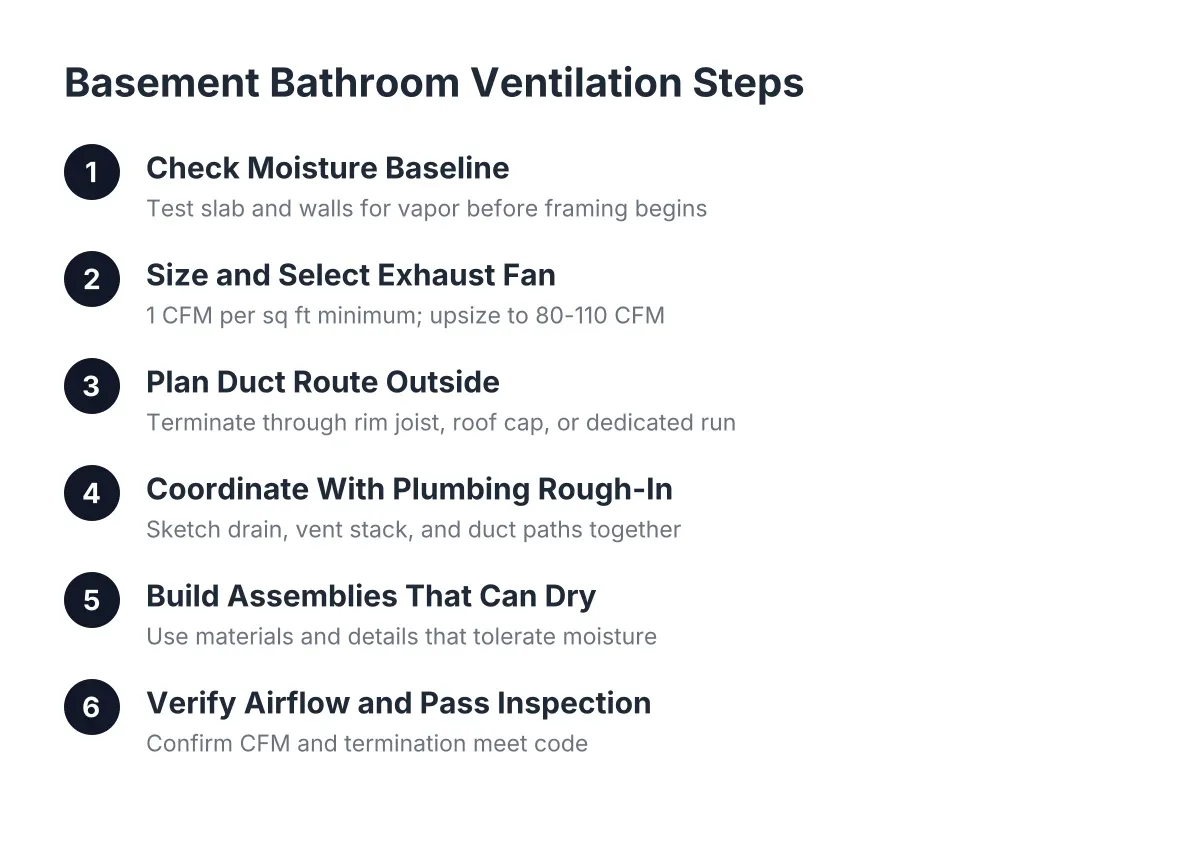
Step 1: Check Your Moisture Baseline Before You Build
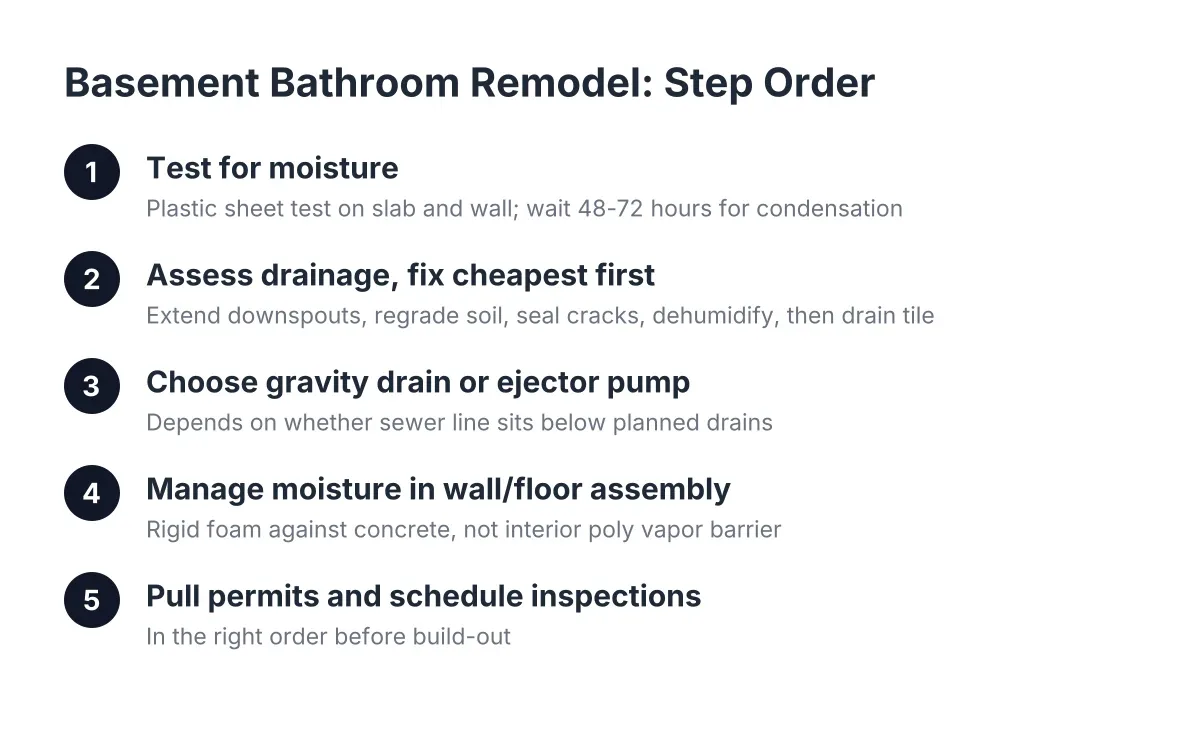
Start by finding out how wet your basement already is, because no exhaust fan can outrun a leaking foundation. Tape a square of plastic sheeting to the concrete floor and wall for 48 hours. If moisture beads up underneath, the slab or wall is pushing vapor into the room from the ground, and that needs to be handled before any bathroom framing goes up.
Basement moisture usually comes from vapor pressure pushing through porous concrete, not from the shower you have not built yet. Treating symptoms without addressing that migration is why so many finished basements fail within a few years. In Minneapolis, with our clay soils and long freeze-thaw cycles, this check is not optional.
A vapor barrier placed over the base course under a concrete slab blocks moisture from moving out of the ground into the concrete above, according to W. R. Meadows. If your home is older and you are not sure one exists under your slab, plan on a dimpled subfloor system in the finished area. Even a basement with a slab vapor barrier can still benefit from a subfloor system, because it protects the finished space from future moisture events like a water heater leak.
Step 2: Size and Select the Right Exhaust Fan
Next, pick a fan rated for the room, not just the cheapest unit at the store. The general rule is one CFM (cubic foot per minute) of airflow per square foot of bathroom. A typical 5-by-8 basement bathroom is 40 square feet, so a 50 CFM fan is the floor, not the target. Because basement runs are longer and duct resistance eats airflow, most contractors upsize to 80 or 110 CFM.
Look for these features when comparing fans:
- A sone rating of 1.0 or lower, so it is quiet enough that people actually run it
- A built-in humidity sensor or a delay timer, so the fan keeps running 20 to 30 minutes after a shower
- An ENERGY STAR listing if you want lower operating cost, since a humidity-sensing fan may run often in a basement
- A duct connection of 4 inches or larger; bigger duct means less resistance on a long basement run
For the Code-Compliance Worrier, here is the plain answer: Minnesota code requires mechanical exhaust in any bathroom without an operable window, and nearly every basement bathroom falls in that category. The fan is not a nice-to-have. It is a pass-or-fail inspection item.
Step 3: Plan the Duct Route to the Outside—Basement Bathroom Exhaust Venting Best Practices
Now decide where the moist air goes, because this is where most basement bathroom exhaust venting failures start. The duct must terminate outdoors through a wall cap or roof cap with a damper. It can never dump into a joist bay, the attic, a crawl space, or the garage. Venting into the structure just relocates the mold problem to a spot you cannot see.
In a basement, you have three realistic routes:
- Out the rim joist. The shortest and usually best path. The duct runs through the joist bay above the bathroom and exits through the band of wood at the top of the foundation wall, capped with a damper hood.
- Up an interior chase to the roof. Longer run, more elbows, and in Minnesota a roof cap can frost over in January. Workable, but a second choice.
- Tying into an existing duct. Do not tie a bath fan into a dryer duct or furnace vent. Inspectors will flag it, and backdrafting is a real safety issue.
Keep the run as short and straight as you can, use smooth rigid duct instead of flex where possible, and slope the duct slightly toward the exterior so condensation drains out, not back into the fan. In our climate, insulate any duct passing through unconditioned space; warm moist air in a cold duct condenses fast, and that dripping is the classic "why is my basement bathroom exhaust venting system leaking" complaint.
Step 4: Coordinate Ventilation With the Plumbing Rough-In
Exhaust ducting and drain lines compete for the same joist bays, so plan both at once. Before framing, your contractor should sketch a bathroom plumbing rough-in diagram showing where the drain, vent stack, supply lines, and exhaust duct all run. Finding out at drywall stage that the fan duct and the toilet vent want the same bay is an expensive surprise.
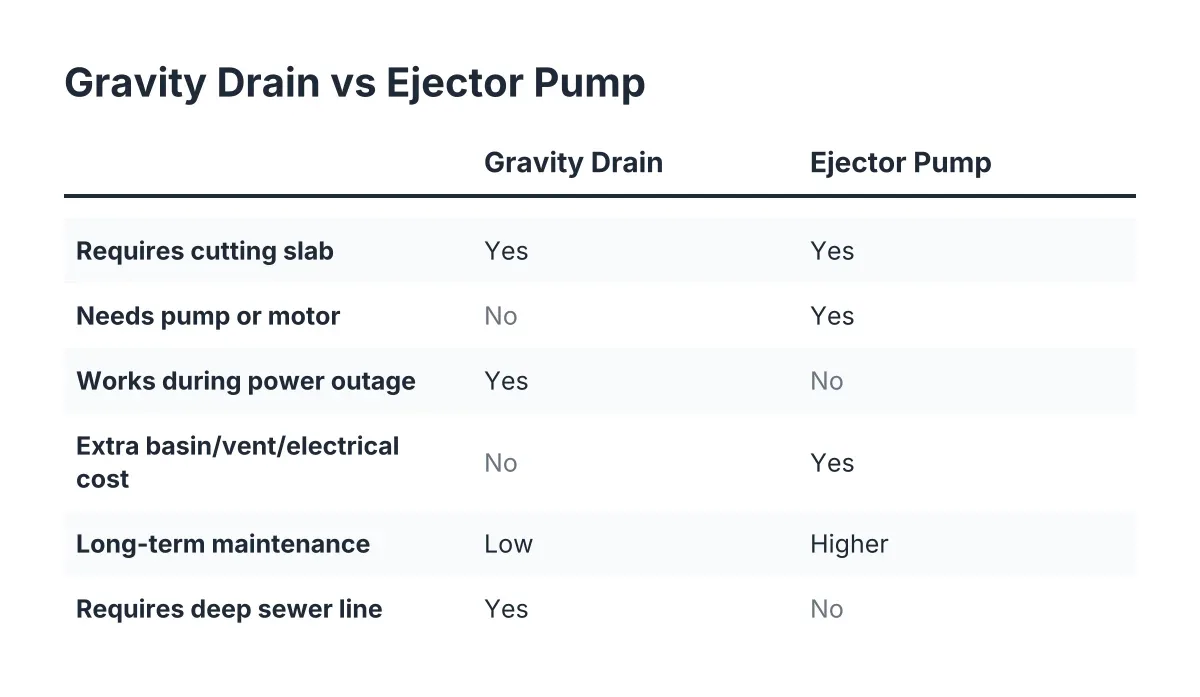
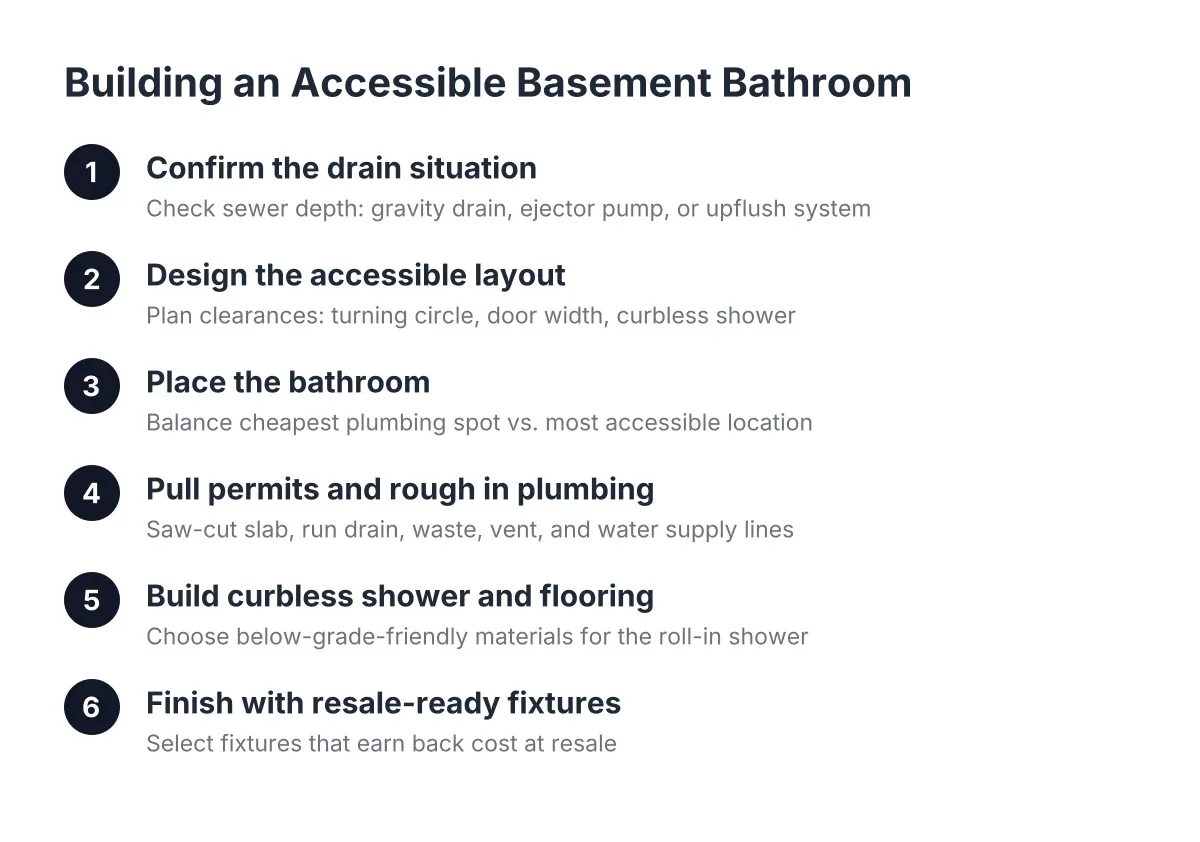
This is also where the below-grade plumbing question comes in. If your main sewer line exits above the level of the new bathroom floor, gravity drainage is off the table and you will need a sewage ejector pump for the basement bathroom, set in a sealed pit below the slab. An upflush toilet for a basement is the lighter-duty alternative that avoids breaking concrete, though it limits fixture placement and adds a motor you will hear. Both systems are code-legal when installed and vented correctly; the ejector pit itself needs its own vent, which is one more line to route in that same ceiling.
Permits matter here. In Minneapolis, adding a basement bathroom requires plumbing, electrical, and building permits, and the exhaust termination is one of the things the inspector checks. As of 2026, expect the mechanical inspector to want to see the duct route before insulation covers it. A permitted, inspected bathroom is also what protects you at resale; an unpermitted one is exactly the kind of thing a pre-listing inspection digs up.
Step 5: Build Wall and Floor Assemblies That Can Dry
Ventilation moves air, but the wall and floor assemblies decide whether trapped moisture can escape. Basement walls need moisture control in two directions: they have to stop warm indoor air from condensing on cold concrete, and stop soil moisture from wicking into the framing.
Here is the mistake that ruins more basement bathrooms than any other. Homeowners assume any vapor barrier helps, then staple poly sheeting on the interior side of the stud wall. That traps moisture inside the cavity, where it cannot dry back into the room, and mold follows. Skip interior poly. Use rigid foam against the concrete, keep wood framing off the slab, and let the assembly dry inward.
Airtightness matters more than the barrier itself. Air leaking into a wall cavity carries far more moisture than vapor diffusing through materials, so seal penetrations, especially around the fan housing and duct, with caulk or foam. In addition, choose materials that shrug off humidity:
- Paperless or moisture-resistant gypsum board instead of standard drywall
- Cement board, not greenboard, behind tile in the shower
- A dimpled subfloor panel under any finished flooring, so vapor under the floor can migrate and escape instead of accumulating
- Tile or luxury vinyl plank basement flooring rather than carpet in the bathroom itself
That musty basement smell homeowners describe is usually moisture meeting organic material, paper drywall facing, wood, or carpet pad, behind the finished surface. Build with materials that give mold nothing to eat.
Step 6: Verify Airflow and Pass Inspection
Finally, test the system before you call it done. A simple check: hold a square of toilet paper against the running fan grille. If the fan cannot hold it in place, the duct run is choking the airflow and needs fixing before final inspection. Confirm the exterior damper opens when the fan runs and closes when it stops; a stuck damper lets January air pour into your new bathroom.
Suppose a homeowner in south Minneapolis converts part of the basement into a guest suite for an aging parent, with a 45-square-foot bathroom against the foundation wall. In that scenario, a sensible basement bathroom exhaust venting setup is a 110 CFM humidity-sensing fan, a 6-foot insulated rigid duct out the rim joist, paperless drywall, and a dimpled subfloor under vinyl plank. That package adds a modest amount to the project, and it is the difference between a bathroom that stays dry for 20 years and one that smells musty by year three.
One honest limitation: if your foundation actively leaks, or the moisture test in Step 1 shows heavy vapor drive, ventilation alone will not save the project. That situation calls for drainage or waterproofing work first, and it is worth having a contractor or a basement waterproofing specialist look before you spend money on finishes.
Where Ventilation Fits in the Bigger Remodel
Ventilation is one line item inside a larger basement bathroom remodeling project, alongside layout, plumbing, flooring, and finishes, but it punches above its cost. Angi puts an average basement remodel between $30 and $75 per square foot, and the fan, duct, and moisture-smart materials are a small slice of that. The payoff is durability plus livability; homeowners gave basement finishing a joy score of 9.5 out of 10 in the National Association of Realtors Remodeling Impact Report, and that number assumes the space stays fresh and dry.
For an empty-nester planning main-level-style living downstairs, or anyone worried about passing inspection the first time, the sequence above is the checklist to hold your contractor to. Get the moisture baseline, size the fan honestly, route the duct outside, coordinate it with the rough-in, build assemblies that dry, and test before the inspector arrives. That is how basement bathroom exhaust venting prevents mold instead of chasing it.
If you need basement finishing, Minneapolis Basement Finishing Pros can help.
Prefer to talk it through? Call (651) 758-8806 — a quick call is usually the fastest way to get a straight answer for your situation.